本文你將會學到
- 如何新增一筆文章資料
- 如何修改資料庫一筆文章資料
- 使用Postman測試POST與GET
前言
昨天已經將資料庫欄位都建立好了,今天開始要教導各位如何使用 JavaScript 與 MySQL 串接資料庫欄位並實作新增(INSERT)、修改(UPDATE)、刪除(DELETE)、顯示(SELECT),由於比較複雜所以拆開兩部分來教學,這篇先以新增、顯示實作,在開始之前請先分別建立 article.controller.js 在 controllers 資料夾以及建立 article.module.js 在 modules 資料夾還有建立 article.route.js 在 routes 資料夾,今天實作會動到這三支新檔案以及原有的 index.route.js。
事前準備
今天要繼續實作的程式是延續 [Day-23] API與資料庫連線設定 的專案繼續實作,想跟著今天的實作可以先下載下面的整包程式,記得要先 yarn install 將整個依賴的軟體安裝回來。
程式碼:https://github.com/andy6804tw/RESTful_API_start_kit/releases/tag/V6.0.0
設定路由
index.route.js 是管理所有路由的地方,而 article.route.js 路由裡有新增、修改、刪除、顯示的路徑,所有有關 article 的請求動作都在這裡面。在 index.route.js 中首先引入(import) article.route 的檔案儲存為一個名為 article 的變數,然後新增一個路由路徑為 /article ,後面的參數 article 表示引用 article.route.js 內所有的路由動作(GET、POST、PUT、DELETE)。
- index.route.js
// Router
import article from './article.route';

...略

/** Article Router */
router.use('/article', article);

...略
新增(Article)
article.module.js
module 檔案是最終與資料庫做存取的地方,傳入值 insertValues 是使用者要新增的資料為一個物件 Object 型態,這個變數是由 article.controller.js 傳過來的。
connection.query() 是一個方法,能夠直接在裡面撰寫 sql 語法來做資料庫的存取,此寫法是用 ES6 的 Promise ,你可以把 Promise 當作是 Call back 的進化版,能夠將一件事情做完最後回傳結果由 then 來接收,接收的動作是在 controller 完成,然而 module 的功用是將資料庫資料撈取出來並存成 json 格式經由 resolve() 傳出結果,若有錯誤的話訊息會經由 reject() 傳出。
// article.module.js
import mysql from 'mysql';
import config from '../../config/config';

const connectionPool = mysql.createPool({
  connectionLimit: 10,
  host: config.mysqlHost,
  user: config.mysqlUserName,
  password: config.mysqlPass,
  database: config.mysqlDatabase
});
/* Article  POST 新增 */
const createArticle = (insertValues) => {
  return new Promise((resolve, reject) => {
    connectionPool.getConnection((connectionError, connection) => { // 資料庫連線
      if (connectionError) {
        reject(connectionError); // 若連線有問題回傳錯誤
      } else {
        connection.query('INSERT INTO Article SET ?', insertValues, (error, result) => { // Article資料表寫入一筆資料
          if (error) {
            console.error('SQL error: ', error); // 寫入資料庫有問題時回傳錯誤
            reject(error);
          } else if (result.affectedRows === 1) {
            resolve(`新增成功! article_id: ${result.insertId}`); // 寫入成功回傳寫入id
          }
          connection.release();
        });
      }
    });
  });
};
export default {
  createArticle
};
article.controller.js
controller 檔案就是接收 module 中 Promise 函式所運行的結果,經由 then 得到一個變數 result 這是個物件可以查看裡面所回傳的訊息,若新增資料成功會回傳成功的訊息,然而 catch 是接收錯誤例外的地方,程式運行有問題就會跑進來此函式並爆出錯誤內容。
// article.controller.js
import articleModule from '../modules/article.module';

/* Article  POST 新增 */
const articlePost = (req, res) => {
  // 取得新增參數
  const insertValues = req.body;
  articleModule.createArticle(insertValues).then((result) => {
    res.send(result); // 成功回傳result結果
  }).catch((err) => { return res.send(err); }); // 失敗回傳錯誤訊息
};
export default {
  articlePost
};
article.route.js
route 是設定每條 api request 的地方,由於是要新增資料所以這邊使用 post 請求方式將資料上傳到資料庫,後面的參數就是指定執行 articleCtrl 中的 articlePost 函式。
// article.route.js
import express from 'express';
import articleCtrl from '../controllers/article.controller';

const router = express.Router();

router.route('/').post(articleCtrl.articlePost); /** 新增 Article 值組 */

export default router;
POST測試
首先將程式碼 yarn build 再 yarn start 後開啟 Postman 在網址列輸入 localhost:3000/api/article 並選擇 POST 請求方式,接下來是要放入 POST 的內容,Body > raw > 選擇 JSON(application/json),將所有要新增的資料寫成 JSON 格式在下面空白處如下圖,最後再點選 Send 送出,最下面就會回傳你的新增結果囉!若有寫入資料庫成功他會回傳新增該筆資料的 id 位置。
{
    "user_id": 1,
    "article_title": "Node.js教學",
    "article_tag": "後端",
    "article_content": "歡迎來到此篇教學。"
}


顯示(Article)
article.module.js
顯示的意思就是將資料表裡的所有值組撈出來,整個架構跟 POST 一樣只差別在 Query 方式不同,首先也是先動最底層的檔案 article.module.js 建立一個名為 selectArticle 的箭頭函式並使用 sql 語法中的 SELECT 將 Article 所有欄位的值組全數撈出來。
// article.module.js
...略
/*  Article GET 取得  */
const selectArticle = () => {
  return new Promise((resolve, reject) => {
    connectionPool.getConnection((connectionError, connection) => { // 資料庫連線
      if (connectionError) {
        reject(connectionError); // 若連線有問題回傳錯誤
      } else {
        connection.query( // Article撈取所有欄位的值組
          `SELECT
            *
          FROM
            Article`
          , (error, result) => {
            if (error) {
              console.error('SQL error: ', error);
              reject(error); // 寫入資料庫有問題時回傳錯誤
            } else {
              resolve(result); // 撈取成功回傳 JSON 資料
            }
            connection.release();
          }
        );
      }
    });
  });
};
...略
article.controller.js
controller 一樣建立一個名為 articleGet 的箭頭函示接收 module 中 selectArticle 的回傳內容。
// article.controller.js
import articleModule from '../modules/article.module';
...略
/*  Article GET 取得  */
const articleGet = (req, res) => {
  articleModule.selectArticle().then((result) => {
    res.send(result); // 成功回傳result結果
  }).catch((err) => { return res.send(err); }); // 失敗回傳錯誤訊息
};
...略
article.route.js
在 route 新增今日第二個實作的 request 為 get ,後面放上 article.controller 中的 articlePost 函式。
// article.route.js
import express from 'express';
import articleCtrl from '../controllers/article.controller';

const router = express.Router();

router.route('/')
  .get(articleCtrl.articleGet) /** 取得 Article 所有值組 */
  .post(articleCtrl.articlePost); /** 新增 Article 值組 */

export default router;
GET測試
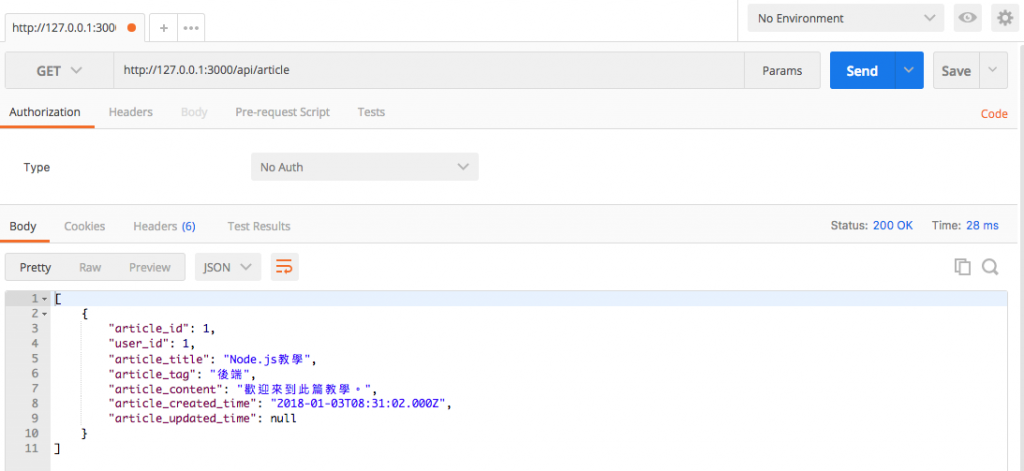
將程式碼 yarn build 再 yarn start 後開啟 Postman 在網址列輸入 localhost:3000/api/article 並選擇 GET 請求方式,最後按下 Send 送出查看底下結果,若有回傳 JSON 恭喜你表示撈取成功。

範例程式碼:https://github.com/andy6804tw/RESTful_API_start_kit/releases/tag/V7.0.0
文章同時發表於:https://andy6804tw.github.io/2018/01/03/user-api-tutorial(1)/